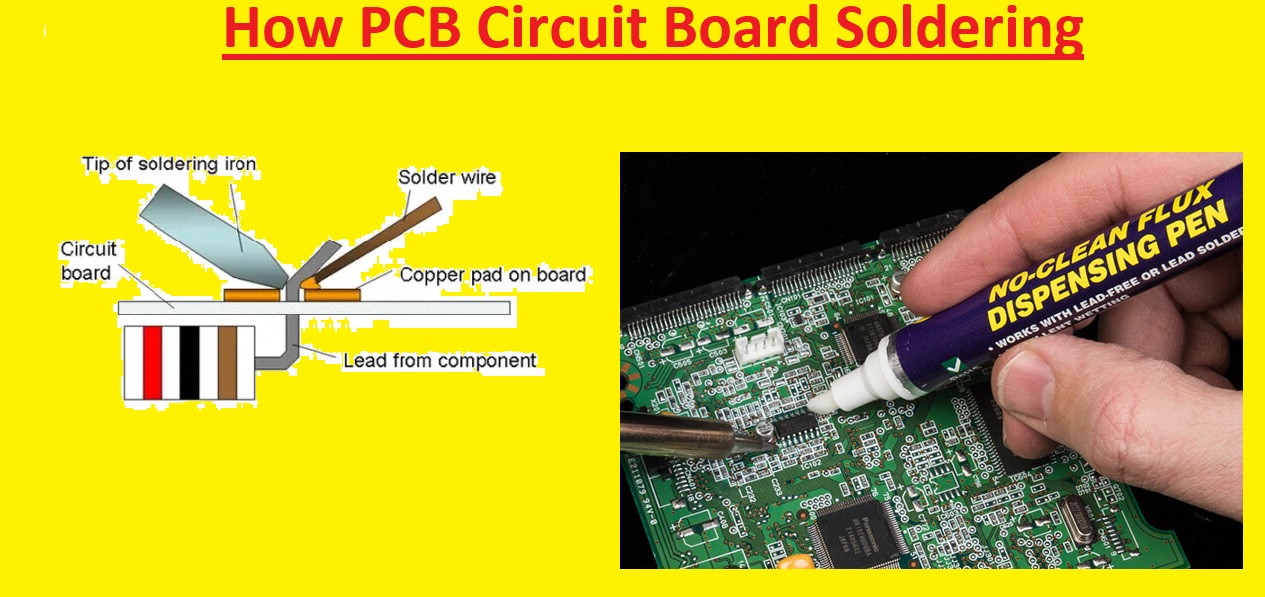
Hi students, welcome to the new post. In this post, we will learn how to solder a PCB circuit board for nners. PCB circuit board soldering is a technique used in electricity to make connections between components. Anyone making projects or preparing devices must know about solder. In this post, we will discuss the detailed process of PCB circuit board soldering, from the basics to troubleshooting common problems. So let’s get started with an introduction to circuit board soldering.
Table of Contents
ToggleWhat Is Soldering?
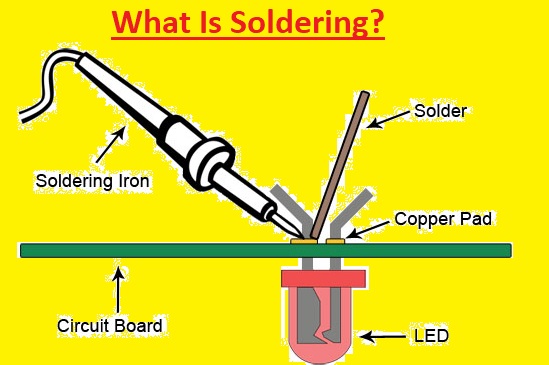
The soldering process involves the joining of two or more electronic components with each other through melting solder over the connection. Solder is a metallic alloy, and when it cools, it makes strong electrical connections between different components. The soldering process makes permanent connections, but it can become weak with the use of desoldering tools.
Tools for PCB Soldering
Soldering Iron
The soldering iron is a hand tool that is connected to a standard 120V AC outlet and heated to melt solder over electrical connections. It is an important tool used for soldering and can have some different types, like pen or gun form.
It is suggested to use a pen-style soldering iron for beginners in the 15W to 30W range. Most soldering irons come with interchangeable tips that are used for different soldering projects.
Try to use any soldering iron properly since it can get heated at about 896°F.
Solder Wire
For electronics projects, commonly used solder wire is made with the use of 40 percent lead and 60 percent tin, and when it cools, it has a melting temperature of 190 degrees.
This alloy comes in wire form in different sizes, and it is better to use this gauge than a thick gauge. For normal uses, solder wire in the gauge of 18 is best.
Solder Flux
Solder flux is an important tool used to clean the metal surface joints before and after soldering, reducing oxidation. The flux provides the wetting, and the soldering process removes oxides over the metallic joint surface and avoids the creation of solder balls.
some types of solder flux are
- Organic acid flux: When soldering metal contacts, acid-based flux ensures that oxides are removed. Since flux is dissolved in water, remnants should be cleaned after the soldering process to avoid corrosion.
- Alcohol-based no-clean flux: Solder pastes come with alcohol-based non-clean flux, or they are a mixture of resin. t does not spray as other flu and evaporates quickly when heated.
- Rosin flux: The fluxes are made with solid rosin, and rosin flux residue does not cause corrosion, so it is used in conditions where removing residual organic flux can be difficult.
Sponge
The sponge helps to keep the soldering iron tip clean by removing the oxidation that is created. Tips with oxidation will become black and not get solder like when new.
Use a conventional wet sponge that has a short lifespan of time due to expansion and contraction. With that wet sponge, it will lose the temperature time when wiped. The best is to use a brass sponge.
Soldering Iron Stand
The soldering iron stand is used to prevent the hot iron tip from making contact with flammable materials or resulting in any injury. Some soldering stations have built-in sponges for cleaning Solder Paste
Solder paste has a gray color, and it is used to connect different components that need to be configured on board
What Are the Different Types of Soldering Techniques?
Soft Soldering
Soldering is a common type of PCB board connection process. This process comes with soldering at a temperature of about 450 °C or 842 °F. Sift soldering is good for the connection of small components on larger boards.
Before melting the component, use tin-lead alloy for filler metal. It comes with a melting point of larger than 400 °C or 752 °F that helps to make strong connections between components and boards.
Hard Soldering
This selling process called brazing connects two different components with the use of an alloy film like brass. This method is used on metal surfaces and makes a strong connection, then soft soldering as the result of the atomic magnetism and diffusion process.
Hard soldering is spreading solder over the holes of components. The holes are then unlocked when face high temperature. It is good to note that you should carefully clean surfaces before starting to remove all grease traces.
Hard soldering also uses silver soldering, which uses silver alloy as a space-filling metal. This process recreates a small part of board-free running. But it is not reliable for space-filling.
Brazing Soldering
Braze soldering comes with both soft and hard soldering for quality purposes and makes stronger connections between boards and electrical components like inductors, transistors, and capacitors. High temperature used for component connection on board. Brazing and hard soldering are the same process; brazing comes with melting the metallic components for their proper configuring. It is the best soldering method for large-scale board manufacturing and generates less heat distortion. Through-Hole Soldering
Through-hole soldering is replaced with SMT components, but it is still used in many applications. SMT is used for compact hardware and has lower-cost projects, but small manufacturers also use through-hole soldering techniques. As compared to SMT components, through-hole components are strong and practical. As a result, through-hole components are preferred for aviation uses that need strong connections in extreme conditions.
Step-by-Step Guide to PCB Circuit Board Soldering
Steps to Soldering a PCB
Follow these steps for PCB soldering.
Soldering Iron Preparation
First, prepare the soldering iron for PCB soldering. started with thinning is coating the tip of iron in solder. helps iron to heat before covering the complete tip with the use of solder. When items are coated clean extra flux and since it can become hard.
Read the Surface
Now ready the board surface. The board must be clean and not have any dust particles or greases. Use an industrial cleaning pad and clear off any particular
Connect Components
First start with small components then move to large components. it helps the board to balance and properly distribute components on board. the best option is to connect components on the lower side that do not have components. Choose some small components and put them over the board. After putting holes bend their leads to 45 degrees which helps components to get their position.
Apply Heat
Use heat heat-resistant pad for PCB soldering to set board position. use a small solder on tip and set the iron so the touch board and lead. The solder will connect both of them, heating the soldering. Hold the iron for a few seconds before using it. For a longer time stay can become iron very hot.
Solder to Joint
When heated touch the tip of the solder with the solder pad and lead. At this point solder must flow smoothly and the flux starts to become liquid. Continue to add solder over the joint to make a small mound. Now remove the soldering iron and place it.
For smooth finishing make sure the joints are cooled properly
Read also:
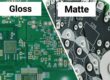
- Matte vs Glossy in PCBs
- Lead vs. Lead-Free Solder in PCB Manufacturing – 2023 Ultimate Guide
- What is PCB Leds Circuit Board: What Do You Need to Know
- Thick Film Ceramic PCB
- What is a Cold Solder Joint and How Can You Prevent it?
- Learn How PCB Circuit Board Soldering Guide for Beginners
FAQs: How do I learn basic soldering?
- Confirm that the soldering iron is completely heated and touch the tip to end of the wire. Hold it on the wire for three to four seconds. Keep the iron in position and touch the solder to the wire until it is coated. Repeat this process on other wires, and it helps to get bases of soldering.
What are the 5 soldering steps?
- Step 1 – Melting the Solder
- Step 2 – Components cleaning
- Step 3 – Placement of the PCB.
- Step 4 – Solder applications
- Step 5 – Cleaning.
Which components to solder first?
- First of all, solder small components such as jumper leads, diode resistors, and any other small parts, then move to the larger components of the circuit, such as the transistor and capacitor.
What type of solder is used in PCBs?
- Lead-free rosin core soldering is commonly used for PCBs.
Which solder is best for PCBs?
- As compared to lead soldering, lead-free is always well for electrical PCB board uses. Lead-free solder does not spread during reflowing. It makes strong bonds without any issues like rapid stencil wear.
What is the best thickness of solder for PCBs?
- The solder resist thickness is about 0.8 mils. Solder masks are thin close to the edges of traces and can be as thin as 0.3 mils or less.
What size solder is best for PCBs?
- The best solder for a circuit board can be solder wire of diameter about t 0.711 mm. The width of this wire is best for boards.
Why is 60/40 solder used?
- 60/40 is soft solder used for the soldering of copper and copper alloys and/or ferrous base alloys. It is not used for soldering of potable water systems due to its high lead content.
What is a good flux?
- A good flux can be clean and easy to remove. It must also be non-conductive. and non-corrosive.
- Normally, the best soldering flux is rosin-based flux. This flux is not corrosive, does not leave residue, and has a lower melting point.
What is a flux used for?
- Before soldering, flux is used for cleaning metal surfaces. It increases the chance of a strong connection made by solder. Fluxes help in avoiding oxidation of the metal surfaces.
What thickness is solder for PCB?
- 0.015 inches to 0.062 inches