Hi, friends, welcome to the new post. In this post, we will learn what a cold solder joint is and how you can prevent it. Soldering is a technique commonly used in electronics and electrical work. It helps to make connections between different components. In some conditions, the soldering process can cause fault connections that are known as solder joints. In this post, we will cover different parameters of cold solder joints and their causes and see how to solve this issue. So let’s get started with What is a cold solder joint?
What is soldering?
- Soldering is the main part of the PCB assembly and protection process. The electronic components are connected to the PCB surface with the use of a tin and lead combination.
- Either you are connecting components to the board with the use of THT, or through-hole technology, but the main basis is a soldering process. That is important for PCB assembly.
- Different techniques used for soldering, like wave soldering, through-hole reflow soldering, and SMT soldering
- The common issue during PCB soldering is colder solder joints. These certain types of solder connections minimize the operation of the PCB board. But PCB assembly prices increase due to cold joints.
What is a cold solder joint?
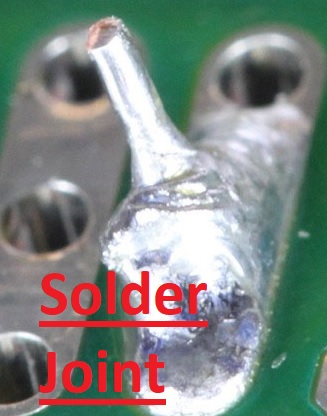
When solder wire is not accurately heated during the soldering process, it can make solder joints that cause a poor connection.
The cold solder joint can occur when the board or soldered wire is misplaced during the time the molten solder is not completely dry.
The cold solder junctions increase resistance, and in some bad conditions, the board can not work completely due to joint destruction.
With that, these joints do not handle vibration since metals are not accurately connected. Also, temperature changes can affect connections made with cold solder. As a result, the board stopped working due to the broken solder joint.
Causes of Cold Solder Joints
Insufficient Heat
The common soldering error that results in the cold joint is there is no proper heating for both surfaces at the same time or not heating effectively.
It exists when the soldering iron has a temperature very low or when the soldering iron is configured on a component pin for a longer time. So it needs reheating.
if the pin of the component is not heated also when the soldering iron tip is touching and the heating pad on board.
Poor Cleaning
During the improper soldering process, different contaminants like grime, greases, and metallic oxide can affect soldered joints to occur accurately. It normally becomes easily seen when solder affects dirty surfaces since it makes beads. Interference can make solder take longer to wet joints and all result in cold solder joints.
How to Identify Cold Solder Joints
Visual Inspection
The visual inspection is a simple method to find that cold solder connections are working well. The simple and easy method is visual.
It helps to make sure that cold joints exist due to many soldering errors.
Some visual aids, like magnifying glasses and light, are used for this testing. This component helps to find a solder connection between two points.
The connection points between the component and board surfaces needed to be light. If light is passed through solder junctions, it means solder connections are not well connected.
Solder joints come with a roughness which means solder alloy is not heated accurately.
Using a Multimeter
Multimeters can also be used to test the continuity and resistance of joints. In this, we can find if there is a cold solder joint.
Continuity Test
Make a connection of testing points with the multimeter by setting the continuity mode and checking the working of the device. The beep sound is heard. For proper working, there is no need for beeping.
Resistance Test
In this test, the multimeter resistance is 100 ohms. The meter’s two terminals must be connected. For working conditions, resistance is zero. Terminals must then be connected to different solder joints. The meter reading was not zero for a damaged cold joint. It shows there is a cold solder joint that exists.
Tips for Preventing Cold Solder Joints
- The temperature of the soldering iron must be set at an accurate temperature for the solder type used.
- The joint must be heated evenly and completely to make sure that the solder melts accurately and flows in the joint.
- Using less solder can result in weak joints, and high solder can result in joints becoming uneven and thick.
- The joint must be cleaned accurately and prepared before soldering to make sure the solder works accordingly.
How to avoid bad solder joints
- Different solder types are made to use. Ensure that you have chosen an accurate solder type.
- With cold joints, the temperature of the soldering iron is important for avoiding bad solder joints. Try to set the temperature at the proper level for the soldering process.
- Ensure the joints are accurate before soldering to make sure that solder passes evenly and fills the joint.
- With cold solder joints, the use of accurate solder is important for avoiding bad solder joints. Very little or very high solder can cause weak and unreliable joints.
- Proper cleaning is needed for joints.
Cold Solder Joint Symptoms
Cold solder joints come with rough surface area, rigidity, and an uneven look. This error shows a high chance of solder joint cracks and board damage.
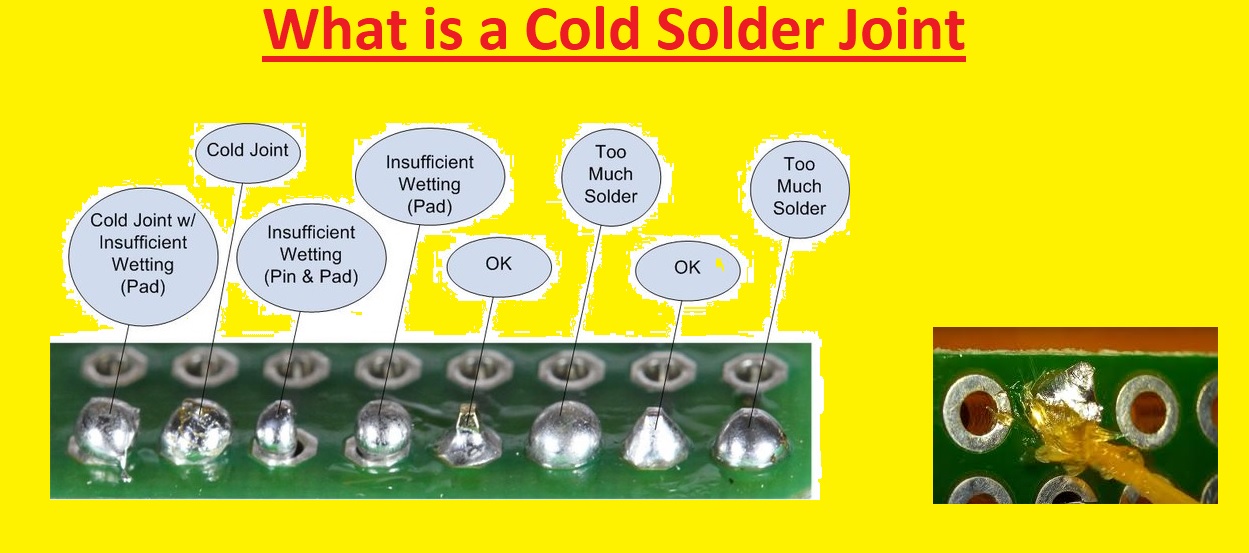
For through-hole components, the best solder joints must have a shiny and concave or cone-shaped appearance.
Effects of Cold Solder Joint
Electrical Conductivity Issues
The cold solder joint that can be cracked or brittle makes an air gap between components. It causes oxidation, which comes with electrical conductivity. It can be intermittent or of electrical conductivity that is converted into unreliability.
Mechanical Instability
Cold solder joints are harmful to boards. Solder joints are made to handle vibration and motion. So inaccurate bonded joints are causes of fatigue due to mechanical stress, resulting in joint failure.
With that, irregular temperature changes can cause damage to cold solder connections. In a short time, the solder joint cracks and affects the board.
How To Repair and Fix Cold Solder Joints
- With the use of a soldering iron, reheat the joint. Use more solder to make sure it passes smoothly and covers complete joints.
- Clean the surface with the use of solvent or flux to remove contaminants.
- Use accurate flux to joint for handling accurate solder flow and bonding.
- Make sure that the soldering iron is set at an accurate temperature for the solder type and component to be connected on the board.
- After completion of resoldering, visually inspect the joint to make sure it is shiny and smooth. Test the device to make sure it is working accurately.
- Help the solder to cool naturally without affecting the joint during the cooling process.
- To avoid solder joints, you must have proper soldering skills with the right amount of solder, steady hands, and controlled heating.
Type of Cold Solder Joints
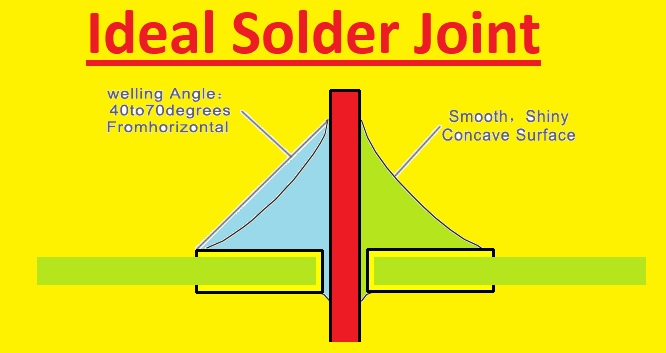
- Dull Joint:
- These joints do not have the shine features of accurate soldered joints. It can be grainy or matte, showing that solder does not pass accurately and bond accurately with components.
- Incomplete Joint:
- The incomplete joints are caused when the solder does not cover the complete connection point. It comes with gaps, or exposing metallic parts causes poor electrical conductivity.
- Brittle Joint:
- if the solder joint is brittle and does not have flexibility. It means soldering is not done well. The brittle joint has board-breaking chances.
- Fillet Lift:
- A fillet is a concave or convex part of the solder that is created between joints and components. In a cold solder joint, a fillet can be left from the component, making the weak bond.
- Cracked Joint:
- Cold solder joint and cracks in solder. These cracks can affect the quality of joints and result in electrical problems.
Read also:
- Best Dual Hose Portable Air Conditioner | Tested by Experts
- Top 08 Quiet Portable Air Conditioner 2024 You Can Buy
- Difference Between Refrigeration and Air Conditioning
- R-290 Propane Refrigerant PT Chart
- Difference Between a Single and Double Pole Breaker
- R-290 Propane Refrigerant PT Chart
FAQs
How do you prevent cold solder?
- To avoid this issue, there is a need to solder the board on an accurately secured table or wall-mounted soldering vise for space constraints. Ineffective heating of soldering iron and contaminated tips is the main problem of cold solder joints. Ensure that the soldering tip is clean before use.
What is a cold joint when soldering?
Cold solder joints occur when the solder wire is not heated properly during the soldering process, making inaccurate points. Cold solder joint also occurs when the board of wires is disturbed before the molten solder solidifies.
- What is cold solder called?
A cold solder joint is also called an old solder or a “dry joint.”
How do you prevent dry solder joints?
- Surfaces must be clean.
- Ensure that the solder is accurate, use good, and keep the right temperature during this process.
What is a dry joint and how can it be avoided?
- The dry joint is dull or grainy looking after the joint is created. This appearance results in the crystallization of liquid solder. Less old will cause dry and unreliable joints. Cold solder joints are dull and can crack.
- Clean the points of the surface accurately for wetting, and use the right iron temperature. So we can avoid bad solder joints and other issues with your work.