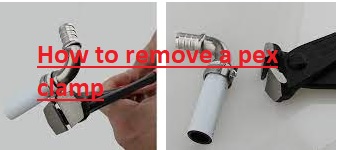
Hello readers welcome to the new post. Here we will cover the details of How to Remove a PEX Clamp. If you are working on plumbing projects which are involved PEX tubing, you can face conditions where you have to remove the PEX clamp. Whether it is for repairs, replacements, or modifications removing a PEX clamp can be intimidating at first. Though, with accurate tools and methods it can be a simple process. In this post, we will cover the details of How to Remove a PEX Clamp
Introduction to PEX Clamp
PEX (cross-linked polyethylene) tubing is mostly used in plumbing systems due to its durability, flexibility, and ease of installation. PEX clamps are employed to secure connections between PEX pipes and fittings, make sure a watertight seal. When the need arises to eliminate a PEX clamp, follow these points for a successful outcome.
Gather the Necessary Tools
Before you start, gather the tools that you needed
- Adjustable wrench
- PEX clamp removal tool
- Safety goggles
- Gloves
Turn Off the Water Supply
Before working on any plumbing project, always must turn off the water supply to avoid accidental leaks or water damage.
Identify the PEX Clamp Type
There are different PEX clamp types, like stainless steel cinch clamps and copper crimp rings. Find the type of clamp you’re dealing with, as the removal process can be changes
Release the Pressure
Release any pressure in the PEX system by opening a faucet configured to the line you’re working on. It will help to avoid any water from spewing out when you eliminate the clamp.
Access the PEX Clamp
Locate the PEX clamp that needed to be removed. Clear the area to make sure you have enough space to work comfortably.
Choose the Right Method
Based on the type of clamp and your needs, can choose between the twist-and-pull method or the cutting techniques to remove the clamp.
Twist-and-Pull Method
This method works well for cinch clamps. Follow these points
- Use the adjustable wrench to grip the tab of the clamp.
- Twist the clamp back and forth while gently pulling it away from the fitting.
- As you twist and pull, the clamp will gradually decrease and can be eliminated
Cutting Method
For crimp rings, the cutting techniques are more effective:
- Configure the cutting edge of the PEX clamp removal tool against the crimp ring.
- Squeeze the tool’s handles to cut through the crimp ring.
- Once cut, the crimp ring can be easily eliminated
Execute the Chosen Method
Follow the steps for the selected method:
Twist-and-Pull Method Steps
- Grip the tab of the cinch clamp with the adjustable wrench.
- Twist and pull the clamp until it loosens.
- Remove the clamp from the fitting.
Cutting Method Steps
- Position the PEX clamp removal tool around the crimp ring.
- Squeeze the handles to cut through the crimp ring.
- Dispose of the cut ring safely.
Inspect for Damage
After eliminating the clamp, inspect the PEX pipe and fitting for any damage. Replace them if needed.
Replace or Reconnect
Based on your project, we can need to replace the fitting or reconnect it using a new clamp.
Test for Leaks
When you’ve made the necessary configurations, turn on the water supply and test for any leaks. Solve any faults promptly.
Safety Precautions
- Always wear safety goggles and gloves to protect your eyes and hands.
- Be cautious when using tools to prevent injury.
- make sure the water supply is turned off before starting.
Common Mistakes to Avoid
- With use of excessive force, which could damage the PEX pipe or fitting.
- Not wearing protective gear, cause potential injuries.
- Failing to identify the accurate clamp type.
Removing PEX Clamp Using an End Cutter
- Clean the Working Area: Make sure the area about the PEX clamp is clean and free from any debris or obstructions. This will offer good visibility and access to the removal process.
- Cut the Fitting Assembly: Use an appropriate tool, like a PEX end cutter, to cut the PEX pipe just before the fitting assembly to which the PEX clamp is connected. Ensure to cut cleanly and squarely to make sure an accurate seal when reassembling.
- Cut Through the Clamp Ear: Find the PEX clamp on the fitting assembly. The clamp typically comes with a metal ring with 2 ears that are crimped about the PEX pipe and fitting. Using the end cutter, carefully cut through one of the clamp’s ears. Follow precautions not to damage the fitting or pipe underneath.
- Remove the PEX Clamp: When one of the clamp ears is cut, you must be able to gently pry open the clamp with the use of pliers or a similar tool. Carefully remove the complete clamp from the PEX pipe and fitting.
- Remove the PEX Pipe: With the clamp removed, we can now easily slide the PEX pipe out from the fitting assembly. If there are any remaining clamp remnants, carefully eliminated them using pliers or another best tool.
Removing PEX Clamp Using a Pipe Cutter
- Clean the Working Area: Ensure the area around the PEX clamp is clean and free from any debris or obstructions. This will provide better visibility and access to the removal process.
- Identify the Clamp Location: Locate the PEX clamp on the fitting assembly. The clamp is normally a metal ring with ears crimped about the PEX pipe and fitting.
- Position the Pipe Cutter: Set the pipe cutter around the PEX pipe just before the fitting assembly to which the PEX clamp is connected. Ensure the cutter’s blade is configured accurately and perpendicular to the pipe.
- Cut through the Pipe: Start tightening the pipe cutter’s blade onto the PEX pipe. Rotate the cutter about the pipe while continuing to tighten it gradually. Apply even pressure to make sure a clean and precise cut.
- Cut Through the Clamp: As you cut through the PEX pipe, the pipe cutter’s blade will also cut through the clamp that’s connected to the pipe. Keep rotating the cutter until the cut is completed and the PEX pipe is cleanly severed.
- Remove the PEX Pipe: With the pipe cut, we can easily eliminate the PEX pipe from the fitting assembly. If there are any remaining clamp remnants, carefully remove them through pliers or another suitable tool.
- Inspect and Reassemble: Inspect the fitting assembly and the PEX pipe end for any sharp edges or debris. If needed, use a utility knife or sandpaper to smooth any rough areas. When reassembling, ensure to use a new PEX clamp for a secure and leak-free connection.
How to Remove a PEX Cinch Clamp
- Gather Your Tools: Ensure you have all the necessary tools for the job. You’ll need pliers or a cinch clamp removal tool specifically made for this purpose.
- Locate the Cinch Clamp: Identify the PEX cinch clamp that needed to remove. It’s a metal ring with tabs that have been crimped about the PEX pipe and fitting.
- Position the Pliers or Cinch Clamp Removal Tool: If you’re using pliers, open them and position one jaw of the pliers more than one of the cinch clamp’s tabs. If you have a cinch clamp removal tool, follow the manufacturer’s guidelines to position it accurately
- Open the Cinch Clamp: Apply steady pressure on the pliers or cinch clamp removal tool to open the cinch clamp. The main purpose is to spread apart the tabs that were originally crimped about the PEX pipe.
- Rotate and Repeat: While maintaining pressure on the pliers or tool, rotate the cinch clamp slightly. it helps to further decrease the grip of the clamp on the PEX pipe. Repeat this step if needed, gradually working around the clamp.
- Slide the Cinch Clamp Off: As you rotate and apply pressure, the cinch clamp should start to slide off the PEX pipe. Continue this process until the cinch clamp is removed.
- Inspect and Reassemble: After removing the cinch clamp, check the fitting assembly and PEX pipe for any damage or sharp edges. Smooth out any rough points if needed. When reassembling, there needs a new cinch clamp to secure the PEX pipe to the fitting.
- Install the New Cinch Clamp (Optional): If you have to replace the cinch clamp, follow the manufacturer’s instructions to install the new one. Position it over the PEX pipe and fitting, then uses a cinch clamp tool to crimp the tabs firmly around the pipe.
- Gather Materials: There is a need for a pair of adjustable pliers or a specialized pinch clamp removal tool. Ensure you have accurate eye protection as well.
- Turn Off Water: Before starting, turn off the water supply to the PEX pipe you’re working on. This will avoid any accidental leaks or spraying.
- Release Pressure: If there is any residual pressure in the PEX system, remove it by opening a faucet downstream from the clamp.
- Locate the Clamp: Find the stainless steel pinch clamp that you have to remove. It must be visible on the PEX pipe as a small, circular metal band.
- Position the Pliers: Use the adjustable pliers or pinch clamp removal instruments to grip the pinch clamp. Position the instrument jaws around the clamp, ensuring a firm grip.
- Squeeze and Rotate: Squeeze the pliers or tool handles together to compress the pinch clamp. During squeezing, gently rotate the tool back and forth. it will loosen the clamp’s grip on the PEX pipe.
- Slide Off the Clamp: As we continue squeezing and rotating, can feel the clamp becoming looser. When it’s loose enough, slide the clamp off the PEX pipe. Be ready for a little bit of water to come out when you remove the clamp.
- Inspect and Replace: After removing the clamp, check the PEX pipe for any damage or wear. If needed, we can cut a small part of the PEX pipe if it was crimped by the clamp. During replacing the clamp, ensure to use a new one to confirm a secure connection.
- Test the Connection: Turn the water supply back on and test the connection for any leaks. If there are any leaks, turn off the water and re-check the clamp for proper installation.
Remove pex clamp with a screwdriver
- Gather Tools and Safety Gear: Put on eye protection and gather a flathead screwdriver and a pair of needle-nose pliers.
- Turn Off Water: Before starting, turn off the water supply to the PEX pipe you’re using to avoid any potential leaks.
- Release Pressure: Open a faucet downstream from the clamp to release any residual pressure in the PEX system.
- Locate the Clamp: Find the stainless steel pinch clamp that you want to remove. It appears as a circular metal band around the PEX pipe.
- Position the Screwdriver: Insert the flathead screwdriver’s tip into the gap between the clamp’s ends. Ensure the screwdriver is aligned with the clamp’s seam.
- Apply Pressure: apply pressure on the screwdriver’s handle to pry open the clamp’s ends. Try not to damage the PEX tubing while doing this.
- Slide off the Clamp: When you pry the clamp open with the screwdriver, use the needle-nose pliers to slide the opened end of the clamp away from the PEX tubing.
- Inspect and Replace: After removing the clamp, check the PEX pipe for any damage or wear. Replace the clamp with a new one if required
- Test the Connection: Turn the water supply back on and test the connection for any leakage. If there are any leaks, turn off the water and recheck the clamp’s installation.
how to install pinch clamps
To install pinch clamps on PEX tubing, use these steps:
- Gather Materials: There is a need for PEX tubing, the correct fittings, and stainless steel pinch clamps. Ensure you have the accurate size of the pinch clamp for PEX tubing.
- Cut the PEX Tubing: Use a PEX pipe cutter to cut the PEX tubing to the required length. Make sure the cut is clean and straight.
- Prepare the PEX End: Slide a PEX support sleeve onto the PEX tubing end. it helps maintain the round shape of the tubing and offers support for collapse during the crimping process.
- Insert Fitting: put the PEX fitting (like a barbed fitting or an adapter) into the PEX tubing end. Confirm it goes in fully to make a secure connection.
- Position the Pinch Clamp: Slide the stainless steel pinch clamp over the PEX tubing and onto the fitting. Position it about 1/4 inch to 1/2 inch from the end of the PEX tubing. Make sure the clamp is centered on the barbed part of the fitting.
- Crimp the Pinch Clamp: Use a PEX crimping tool to crimp the pinch clamp onto the PEX tubing. Put the jaws of the crimping instrument over the pinch clamp, aligning them with the crimping ribs on the clamp.
- Crimp the Clamp: Squeeze the crimping tool handles firmly and evenly till hear or feel a noticeable click. This shows that the clamp has been accurately crimped.
- Check the Connection: Inspect the crimped connection to make sure that the pinch clamp is completely fastened around the PEX tubing and fitting. There must be no visible gaps or spaces between the clamp and the tubing.
- Test for Leaks: Turn on the water supply and test the connection for any leakage. Monitor the connection closely for some minutes to make sure it holds without any issues.
- Repeat for Other Connections: If you have different connections to make, repeat the above steps for everyone.
Faqs
- How do you remove a PEX clamp without a tool?
- Removing a PEX clamp without a tool can be difficult, but you can try the use of needle-nose pliers or a small flathead screwdriver to carefully open and release the clamp’s grip on the PEX tubing.
- Can a PEX clamp be removed?
- Yes, a PEX clamp can be eliminated with the use of specialized tools made for the purpose, like a PEX clamp removal tool or adjustable pliers.
- How do you remove a PEX tubing clamp?
- To eliminate a PEX tubing clamp, use a PEX clamp removal tool or adjustable pliers. Set the tool’s jaws over the clamp, compress and rotate it until the clamp loosens, then slide it off the PEX tubing.
- How do you remove PEX crimp bands?
- PEX crimp bands can be eliminated with a PEX crimp ring removal tool. Slide the tool over the crimp band, squeeze the handles to open the band, and then slide it off the PEX tubing.
- How does the PEX clamp removal tool work?
- The PEX clamp removal tools are operated by gripping the PEX clamp, then compressing and rotating it to loosen its grip on the PEX tubing, which helps for easy removal.
- How do you cut off a crimp?
- We can cut off a crimp with the use of pair of wire cutters or a utility knife. Be careful not to damage the PEX tubing while cutting.
- Can you undo a crimp?
- Crimps are mostly not meant to be undone. When a PEX crimp is applied, it makes a secure connection that is not intended to be disassembled.
- How do you remove a crimp connector?
- To eliminate a crimp connector, you would have to cut off the crimp with the use of wire cutters or a utility knife, then prepare the PEX tubing end for a new connection.
- How do you release a crimp tool?
- To release a crimp tool after applying a crimp, just open the handles of the tool, helping it to release its grip on the crimped ring.
- How do you remove crimp clamps?
- Crimp clamps can be removed with the use of a PEX crimp ring removal tool. Slide the tool over the crimp clamp, compress and rotate it to release the clamp’s grip, then slide the clamp off.
- How do you adjust a PEX crimping tool?
- PEX crimping tools normally have an adjustment feature to set the tool’s jaw size according to the PEX fitting being used. Refer to the tool’s manual to learn how to adjust it properly
- How do you use a PEX crimp ring remover tool?
- To use a PEX crimp ring remover tool, slide the tool on the crimp ring, squeeze the handles to open the ring, and then slide it off the PEX tubing. This tool is specifically made to safely and effectively remove crimp rings