 Hi, readers welcome to the new post. In this post, we will discuss Introduction to Arduino Yun. This type of Arduino is like other Arduino boards its programming features are like Arduino Leonardo and its processor configuration is like Atmel ATmega32U4.
In this post, we will learn different features of applications and some other points with the details. so let’s get started.
Introduction to Arduino Yun
- Arduino Yun is based on ATmega32u4 and the Atheros AR9331 and is a microcontroller. The Atheros processors have support for Linux distribution configured on OpenWrt named Linino OS.
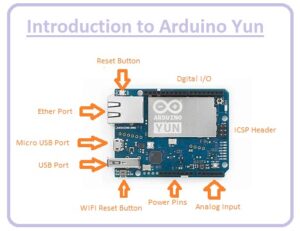
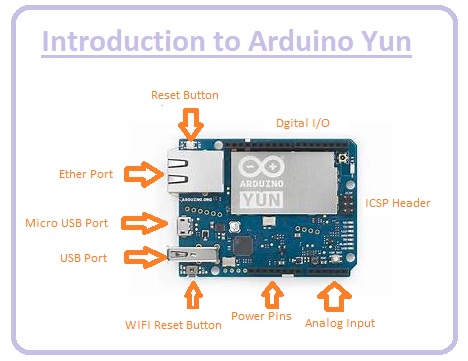
- The board comes with built-in ethernet and wifi, USB A port, 20 digital input, and output pins, 16MHZ crystal oscillator, ICSP header, and 3 reset buttons.
- This Arduino is different as compared to some other Arduino boards since has compatibility for communication with Linux distribution onboard.
- It offers high-power networked computer and Linux commands such as cURL. We can write shell and python scripts for simple interactions.
- This board is like the Leonardo with ATmega32u4
Arduino Yun Structure and Pinout

Power
- Arduino Yun is powered through the use of a micro USB connected to a 5VDC power source.
- Vin pin is used for powering the board and there is a need for a regulated 5VDC since not have onboard regulator. High voltage can affect the board badly.
- It also has compatibility with power through ethernet and is needed to make connections with PoE module board
Power pins are
VIN.
- On this pin regulated 5V voltage is provided.
5V.
- The power source provides power to the controller and other components connected.
3V3.
- The 3.3 volts of power produced through the onboard regulator and high current is about 50mA.
GND.
- It makes the ground connection
IOREF
- The voltage for input-output pins of boards re five volts.
Memory
- ATmega32u4 comes with 32 KB and 2.5KB SRAM memory and 1KB of EEPROM.
- The memory of AR9931 is not configured with the processor. The RAM and storage memory are connected externally. The YUN comes with 64MB of DDR2 RAM and 16MB of flash memory.
- The flash memory is preloaded on a factory having Linux distribution based on OpenWrt called Linino OS.
Input and Output Pins
- There is no access to the input output ins of Atheros AR9331. They are connected with 32U4.
- There are 20 digital input output pins of the YUN board used for input-output purposes through the use of pinMode(), digitalWrite(), and digitalRead() functions.
- They operated for five volts and each pin has a 40mA current and comes with an inner pull-up resistor of 20-50 kOhms.
Serial Pins
- 0 (RX) and 1 (TX): These are used for receiving RX and transmitting TX TTL serial data with use of ATmega32U4 hardware serial capability.
- The serial class is configured to USB communication and TTL serials on Pins 0 and 1. .
Pins 2 & 3
- It used for TWI commands
Pins 0, 1, 2, 3 & 7
- These pins are used for external interrupts
PIns 3, 5, 6, 9, 10, 11, and 13
- They are used for PWM and provide 8-bit PWM output through the use of the analogWrite() function.
SPI
- SPI protocol is done through ISCP headers and they are not connected with Digital IO pins.
Pin 13
- It is connected with built-in led
analog inputs
- There are 12 analog input pins on this baord denoted from A0 through A11.
- Pins A0-A5 are the same points on Uno; inputs A6-A11 are on digital i/o pins 4, 6, 8, 9, 10, and 12
AREF.
- Reference voltatge of analog inputs is provided here through use of the command analogReference().

Reset buttons
Yún RST.
- It makes it low for resetting the AR9331 microprocessor.
32U4 RST.
- If it is low reset the ATmega32U4 microcontroller.
WLAN RST.
- It is used for restoring wifi to the factory point. For restoring wifi press and hole WLAN RST button for 5 seconds.
- Its other function is the WLAN RST button for restoring Linux to default factory image.
Communication
- The Yun comes with different features for communication of computers, other Arduino, or controllers. The ATmega32U4 offers defined UART TTL serial communication.
- 32U4 is also used for serial communication on USB and offers a virtual COM port for software-to-computer connection. It works as full-speed USB 2.0 modules, with the use of standard USB COM drivers.
- The RX and TX LED on board flash when data is transmitted through a USB connection to the computer.
- Digital pins 0 and 1 were used for serial communication for 32U4 and the AR9331.
Arduino Yun Technical Features
| Feature | Description |
| Microcontroller | ATmega32u4 |
| Clock Speed | 16 MHz |
| Operating Voltage | 5V |
| DC Current for 3.3V Pin | 50 mA |
| DC Current for 5V Pin | 800 mA |
| Flash Memory | 32 KB (ATmega32u4) |
| SRAM | 2.5 KB (ATmega32u4) |
| EEPROM | 1 KB (ATmega32u4) |
| Ethernet | 10/100 Mbps |
| WiFi | IEEE 802.11b/g/n |
| USB | 1x USB 2.0 Host, 1x USB 2.0 Device |
| MicroSD Card Slot | Yes |
| Reset Button | Yes |
| Input Voltage | 5-16V |
| Digital I/O Pins | 14 |
| PWM Pins | 7 |
| Analog Input Pins | 6 |
Arduino Yun comparison with top 10 Arduinos
| Board | Digital I/O Pins | Analog Input Pins | PWM Pins | Microcontroller | Clock Speed | Ethernet | WiFi | USB |
| Arduino Yun | 14 | 6 | 7 | ATmega32u4 | 16 MHz | 10/100 Mbps | IEEE 802.11b/g/n | 1x USB 2.0 Host, 1x USB 2.0 Device |
| Arduino Uno | 14 | 6 | 6 | ATmega328P | 16 MHz | – | – | 1x USB 2.0 Device |
| Arduino Mega | 54 | 16 | 14 | ATmega2560 | 16 MHz | – | – | 1x USB 2.0 Device |
| Arduino Micro | 20 | 12 | 7 | ATmega32u4 | 16 MHz | – | – | 1x USB 2.0 Device |
| Arduino Zero | 14 | 6 | 10 | ATSAMD21G18 | 48 MHz | — | – | 1x USB 2.0 Device |
| Arduino MKR1000 | 8 | 7 | 7 | ATSAMD21G18 | 48 MHz | 10/100 Mbps | IEEE 802.11b/g/n | 1x USB 2.0 Device |
| Arduino Due | 54 | 12 | 12 | SAM3X8E | 84 MHz | – | – | 1x USB 2.0 Device |
| Arduino Nano | 22 | 8 | 6 | ATmega328P | 16 MHz | – | – | 1x USB 2.0 Device |
| Arduino Pro Mini | 14 | 8 | 6 | ATmega328P | 16 MHz | – | – | No |
Atmel ATmega32U4
- The Arduino Mega and Leonardo are powered through Atmel’s ATmega32U4 CPU, that also employed in ATmega32U4.
- ATmega32U4 comes with 4 DDR2 256-bit cores (6 in total).
- These cores are used for general computing features the operating frequency is 2.0GHz, and the CPU is for Bluetooth or a WiFi controller.
- 32U4 is used for video and audio processing since ARM Cortex A8 is high speed with less dependable than the other cores.
Atheros AR9331
- Atheros AR9331 is not configured to Wi-Fi 802.11b/g standard and is made for reliable as compared to Atmel.
- ATmega32U4 comes with a larger, more reliable flash ROM with 8K of RAM and uses the universal library for low-level CPU processing.
- The output is reliable code and high speed when downloading firmware. It also possible to use ATmega32U4 to save the state between programs and interrupt the AR9331 from time to time if needed to vary one microcontroller for another. Both microprocessors are configured with the ATmega32U4.
- ATmega32U4 and Atmel ATmega1284P look similar but are different ATmega32U4 consumes less power and comes with 8 IO pins instead of 16 for digital input and output.
Arduino Yun Physical Characteristics
- The length and width of the YUN board are 2.7 and 2.1 inches respectively. The USB connectors coming out.
- distance between digital pins 7 and 8 is 160 mil (0.16″) and the Weight of the board is 32 g.
Arduino Yun Tech Specs
AVR Arduino microcontroller
| Microcontroller | ATmega32U4 |
| Operating Voltage | 5V |
| Input Voltage | 5 V |
| DC Current per I/O Pin | 40 mA on I/O Pins; 50 mA on 3,3 Pin |
| Flash Memory | 32 KB |
| SRAM | 2.5 KB |
| EEPROM | 1 KB |
| Clock Speed | 16 MHz |
| Digital I/O Pins | 20 |
| PWM Output | 7 |
| Analog I/O Pins | 12 |
Arduino Microprocessor
| Processor | Atheros AR9331 |
| Architecture | MIPS |
| Operating Voltage | 3.3V |
| Card Reader | Micro-SD |
| RAM | 64 MB DDR2 |
| Flash Memory | 16 MB |
| SRAM | 2.5 KB |
| EEPROM | 1 KB |
| Clock Speed | 400 MHz |
| Ethernet | 802.3 10/100Mbit/s |
| WiFi | 802.11b/g/n 2.4 GHz |
| USB Type | 2.0 Host |
What is the difference between Arduino Tian and Yun?
- The basic difference between them is that Tian used ARM controller SAMD21G18 with a working voltage is 3.3V, SRAM of 32KB, and Flash memory of 256KB, and Yun used the AVR Microcontroller ATmega 32u4 Operating voltage of 5, SRAM of 2.5KB, and Flash memory 32KB.
What is Arduino Yun used for?
- Arduino YUN best board for designing connected modules and is used for Internet of things projects. It connected with power Linux through the use of Arduino. The Arduino Yun is a controller board configured with ATmega32u4 and the Atheros AR9331.