 Hi, readers welcome to the new tutorial. Here we will learn Arduino Micro. Arduino micro Atmegat32U4 is a type of Arduino Leonardo. It is a controller based on ATmega32U4 work at 16MHZ having 24 digital input/output pins. This board also has male header pins. Here we will discuss the different parameters of this board in detail. So let’s get started.
What is Arduino Micro?
- Arduino Micro is a controller based on ATmega32U4 designed with Adafruit. It comes with 20 digital pins, a 16Mhz crystal oscillator ICSP header micro USB, and a reset button.
- It comes with all the features that are needed to be compatible with the controller, and connect it with a computer through a micro USB cable.
- It comes with a form factor that helps to easily connect with a breadboard.
- The micro board is like the Arduino Leonard since ATmega32U4 comes with a built-in USB protocol, reducing the use of the secondary processor.
- It helps the controller to show connected computers as mouse and keyboard.
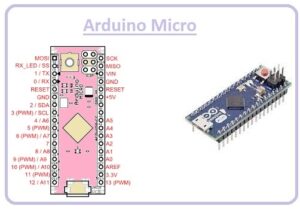
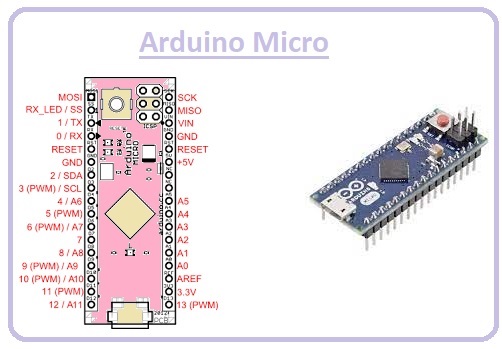
Arduino Micro Pinout
Atmega32U4 Microcontroller
- That is a low-power 8-bit controller having 2.5KB SRAM, 32KB flash, and 1KB EEPROM memory. The working voltage value is from 2.7 to 5.5 volts.
SS
- SS is a slave select line that is used by the master and it operates as an enabled line
GND –
- It is ground pins and connected here circuit ground.
SDA
- It is pin 2 and the data line and pull-up resistors are used for connection with the SDA pin
AREF
- The Analog reference pin is used for providing a reference voltage to the Arduino micro board with outer power sources
SCL
- It is PIN 2 and the clock line uses a pull resistor for connection this pin
MISO
- It is the Master in/ slave output pin and slave line of MISO used for sending data to the master
MOSI
- The slave line of MOSU is used for sending data to connected devices.
SCK
- The SCK is a serial clock. It provides clock generator input. For the master, it operated like an output clock.
PWM pins
- PWM is used for the conversion of digital signal into analog signal. It used where built-in DAC is not exist for the Arduino board. 3, 6, 9, 10, 11, and 13 pins used as PWM.
USB Port
- This pin is used for making connections between a computer with the board.

Difference between Arduino Micro and Arduino UNO
| Feature | Arduino Micro | Arduino Uno |
| Microcontroller | ATmega32U4 | ATmega328P |
| Operating Voltage | 5V | 5V |
| DC Current per I/O Pin | 20 mA | 20 mA |
| Flash Memory | 32 KB | 32 KB |
| SRAM | 2.5 KB | 2 KB |
| EEPROM | 1 KB | 1 KB |
| Clock Speed | 16 MHz | 16 MHz |
| USB Connectivity | USB port | USB-Serial adapter |
| Dimensions | 48 mm x 18 mm | 68.6 mm x 53.4 mm |
| Weight | 7 g | 25 g |
| Input Voltage | 7-12V | 7-12V |
| Digital I/O Pins | 20 | 14 (of which 6 provide PWM output) |
| Analog Input Pins | 12 (on 6 pins) | 6 (on 6 pins) |
Difference between Arduino Micro and Arduino Pro Mini
| Feature | Arduino Micro | Arduino Pro Mini |
| Microcontroller | ATmega32U4 | ATmega328P |
| Operating Voltage | 5V | 3.3V/5V |
| Input Voltage | 7-12V | 3.35 to 12V |
| EEPROM | 1 KB | 1 KB |
| Clock Speed | 16 MHz | 8/16 MHz |
| USB Connectivity | USB port | – |
| Dimensions | 48 mm x 18 mm | 33 mm x 18 mm |
| Weight | 7 g | 2 g |
| Digital I/O Pins | 20 | 14 |
| Analog Input Pins | 12 (on 6 pins) | 8 (on 4 pins) |
| DC Current per I/O Pin | 20 mA | 40 mA |
| Flash Memory | 32 KB | 32 KB |
Difference between Arduino Micro and Arduino Nano
| Feature | Arduino Micro | Arduino Nano |
| Microcontroller | ATmega32U4 | ATmega328P |
| Operating Voltage | 5V | 5V |
| Input Voltage | 7-12V | 7-12V |
| Digital I/O Pins | 20 | 14 |
| Analog Input Pins | 12 (on 6 pins) | 8 (on 8 pins) |
| DC Current per I/O Pin | 20 mA | 40 mA |
| Dimensions | 48 mm x 18 mm | 45 mm x 18 mm x 19 mm |
| Weight | 7 g | 5 g |
| Flash Memory | 32 KB | 32 KB |
| SRAM | 2.5 KB | 2 KB |
| EEPROM | 1 KB | 1 KB |
| Clock Speed | 16 MHz | 16 MHz |
| USB Connectivity | USB port | Mini USB-B |
How does it work?
The Arduino microcontroller is configured with a PCB through USB. When the controller gets power it connects with onboard flash memory through micro USB and connects to the internet through WiFi.
The micro USB employs the USB screen of Adafruit since it shows and is connected through USB.
We can connect it through a USB mouse or also with a keyboard USB.
Arduino Micro comes with features to work without using any PC. We can use commands and make communication with micro through using real-time operating systems like Arduino UNO or Arduino Yo.
What is the difference between Arduino Micro and other boards?
| Features | ARDUINO UNO | ARDUINO NANO | ARDUINO MEGA: | Arduino Micro |
| Microcontroller | ATmega328P – 8-bit AVR family microcontroller | ATmega328P – 8 bit AVR family microcontroller | ATmega2560 | Microchip ATmega32U4 |
| Operating Voltage | 5V | 5V | 5V | 5V |
| Recommended Input Voltage | 7-12V | 7-12V | 7-12V | 7-12V |
| Input Voltage Limits | 6-20V | 6-20V | 6-20V | |
| Analog Input Pins | 6 (A0 – A5) | 6 (A0 – A5) | 54 (of which 14 provide PWM output) | |
| Digital I/O Pins | 14 (Out of which 6 provide PWM output) | 14 (Out of which 6 provide PWM output) | 54 digital input/output pins | 20 (of which 7 provide PWM) |
| DC Current on I/O Pins | 40 mA | 40 mA | 6 DC Current per I/O Pin 40 mA | 20 mA |
| DC Current on 3.3V Pin | 50 mA | 50 mA | 50 mA | 50mA |
| Flash Memory | 32 KB (0.5 KB is used for Boot loader) | 32 KB (2 KB is used for Boot loader) | 256 KB of which 8 KB | 32 KB (4 KB used by bootloader) |
| SRAM | 2 KB | 2 KB | 8 KB | 2.5 KB |
| EEPROM | 1 KB | 1kb | 4 KB | 1 KB |
| Frequency (Clock Speed) | 16 MHz | 16 MHz | 16 MHz | 16 MHz |
The advantages of Arduino Micro
- It is compatible with Arduino Uno, Nano, and Asmio Arduino
- It is small in size and has dimensions of 5 mm x 4 mm x 2 mm
- It has features to operate with small-size batteries like AA batteries.
- It is connected to a host computer through USB.
- It operates with any language and is compatible with Arduino that is compatible with official Arduino IDE.
- It also has features to operate with a power supply and transmit PWM data through SPI interfacing.
- It supported teh 3.3 v and 5V for digital and analog output.
- It supported analog and digital inputs of about 16MHZ.
Technical Specifications of Arduino Micro
| Specification | Value |
| Microcontroller | Microchip ATmega32U4 |
| Operating Voltage | 5V |
| Input Voltage (recommended) | 7-12V |
| Input Voltage (limit) | 6-20V |
| DC Current per I/O Pin | 20 mA |
| DC Current for 3.3V Pin | 50 mA |
| Flash Memory | 32 KB (4 KB used by bootloader) |
| SRAM | 2.5 KB |
| EEPROM | 1 KB |
| Digital I/O Pins | 20 (of which 7 provide PWM) |
| PWM Digital I/O Pins | 7 |
| Analog Input Pins | 12 (on 6 pins) |
Arduino Micro vs Arduino Micro pro
| Features | Arduino Micro | Arduino Micro pro |
| Microcontroller | ATmega32U4 | ATmega32U4 |
| Memory | 32KB of Flash and 1KB of EEPROM | 32KB of Flash and 1KB of EEPROM |
| SRAM | 2KB | 2.5KB |
| Analog Inputs | 12 (6 dedicated and 6 from digital I/O pins) | 9 channels of 10-bit ADC |
| USB | FTDI cable or Sparkfun breakout board | Native USB |
| Clock | 16 MHz | 8MHz |
| Power | 7-9 V | up to 12VDC |
Arduino Pro Micro Applications
- It used for automatic pill dispensers and USB joystick and trackpad
- It used in electric bikes and water level meter
- It also used for wireless keyboard
- It is used to lock and unlock window PCs
Read also


1 Comment