There are different switches used for light wiring but the basic type is a single pole light switch that is used for on and off lights. In basic light switch wiring, the cable provides line voltage from the panel to the light fixture outlet box. cable connected with the light fixture box to the switch box. Here we will discuss different light switch wiring combinations. So let’s get started with the Light Switch Wiring Diagram.
Introduction to Light Switch
- The light switch is an electrical device that is used for controlling light and either device is connected. Many types of switches are used for performing different uses.
- The conventional switch has features to ON or OF the connected light or other device but the latest type of switches as dimmer switches can dim light and on or off according to need.
Components of Light Switch
The main components of the light switch are listed here
Toggles or rockers
- It is a component of a switch that is used for on or off light. If the switch is off circuit is open no current flows for light glow. When the switch is on current flows and the light will on.
Contacts
- It exists in the switch and when we off the switch these contacts separate. When we ON switch contacts make a connection and the light is on.
Terminal screws
- These components are connected at the back side of the switch. These terminals are used for making connections for incoming wires to switch.
Line wires
- These wires carry current from the fuse box to the switch.
Load wires
- These wires provide current from the switch to the light.
How to Install a Light Switch
Materials and Tool Required
- Screwdriver
- Non-contact voltage tester
- Wire labels
- Light switch
- Electrically insulated gloves
- Wire cutters
- Wire strippers
- Needle-nose pliers
How to Wire Light Switch
- First of all off the power supply from the breaker pale and turn off the main switch.
- For new light switch installation connect the required cables from the breaker panel to the point where needs to be installed and then from the switch to the light. But if there is a power supply then can get it from a power source connected nearby. Move two wires having black common wire and white neutral wire and ground from breaker to light switch. Then connect two wires to another cable from the switch to the light
- With the use of non-contact voltage test make sure that power is off to the circuit. Remove the older switch by removing the faceplates.
- For replacing the connected light switch loose mounting screws with a screwdriver and disconnect screw terminals from connected wires.
- Make the connection of the new light switch with wires that previously connected with the switch for the following same connection points.
- In the last step secure the faceplate and on the power and check new switch is working.
Light switch Wiring Colors
- The light switch comes with three wires
- The white wire is the neutral wire and is connected with a silver screw.
- The black or red wire is the hot wire.
- Green wire is ground wire connected with a green screw in the switch

Single Pole Switch Wiring
- Here we have a wiring diagram of a single pole switch where the power supply is connected to a switch and two wires from the switch connected with the light.
- There are two brass terminals, black wire is connected with two switch terminals. Neutral white coming from a source connected with white wire and moving to light.
- Both white and black wires in light are connected to the terminal.

Here is a wiring diagram from a single pole light switch
Light at the center of the circuit
- Here is a circuit made with a switch at one side of it and a light in middle of the circuit. Single pole switch controlling light from wire that moves to light from soruce.

Switch between the power source and light
In this wiring diagram switch is connected between the light and the power supply.

Single Light Switch Wiring Diagram
The single light switch wiring diagram is made where a single light switch is connected in a series combination. When one light switch in the circuit is on state, the light will be turned on. If one light switch is off, the light in the circuit will also be off.

Two switches and two lights Wiring Diagrams
In this light wiring diagram, there are two switches connected. 2 wires from each switch are connected to the light. White wire connected with one bulb terminal and black wire connected with 2 terminals.

2-Way Switching Wiring Diagram
The 2-way switch wiring diagram can be here where incoming and outgoing lines are connected in such a design that is on and off from any side. Two-way switches are normally used in hallways and staircases to control the light from two different points.

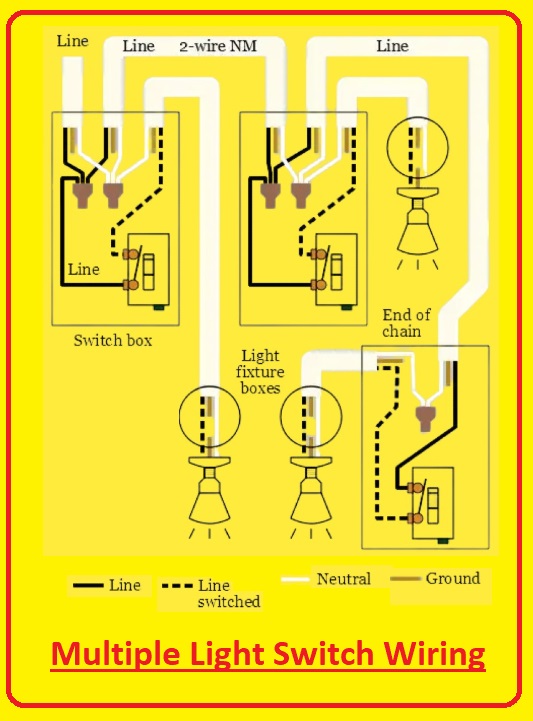
Multiple Light Switch Wiring
Here you can see the wiring diagram for the light switch
3-Way and Single Pole Switch Wiring Diagram
- In this wiring combination line voltage is provided to three-way and single-pole switches. Three wire cables connected from three-way to three-way.
- Two wires are connected from a single pole to a single pole line used for line and neutral. Two wires from every single pole load connected with light. Two light from 3 way load connected with light.

Why are there two black wires on a light switch?
- The black wire on the switch defines one used as hot and another is light. the new switch comes with black for hot white as neutral and blue for light.
What happens if you wire a light switch wrong?
- If the light switch has wrong wiring causes fire which means the current is not controlled from one conductor to another. Loose wires that are not repaired can cause arcing.
What is COM L1 and L2 on a light switch?
- Commonly denoted as COM or C it comes with a live wire that provides input voltage. L1 or L2 terminals are output to light. Based on the type of switch either one way or two way switch L1 terminal or both an L1 and L2 point.
Read also
- What are Ballast wirings DIagrams
- What is Fluorescent Light Ballasts: How do they work?
- Introduction to Occupancy Sensor, Working, Features, Types & Application
- How to Wire a Switch and Outlet Combo
- 4-Way Toggle Switches, Wiring Working, Types, Features,
- 3 way switch wiring diagram : A How to Comprehensive Guide